vaaya / get started
Connect Vaaya to your agent



Start in your browser Open vaaya.ai/chat and use every Vaaya service in your browser, with any of 340+ models and nothing to install. It spends the same balance as every connector below, so you can come back here whenever you want the same services inside your own agent.
Using Muse? Connect Vaaya and explore its tools and recipes. For stocks, use the separate trading research guide.
Choose how to connect
Choose your app above for setup instructions. You can connect a coding agent from your terminal or add Vaaya in an AI app’s settings.
Developer setup, MCP or API
Claude Code, Cursor, VS Code, Codex, Gemini CLI, OpenClaw, Hermes. Paste one line into the tool and press Enter. Prefer raw HTTP? The API reference covers the same catalog with one key.
Connect from an AI app
Claude Desktop, Claude on the web, and ChatGPT. You add Vaaya from a settings screen inside the app. No commands, no terminal.
You do not need “npx”, “mcp-remote”, or any helper. Vaaya is hosted, so every app connects straight to https://vaaya.ai/mcp.
How to open a terminal
On a Mac, “Terminal”
Press ⌘ Cmd + Space, type Terminal, press Enter. A window opens. Click in it, paste with ⌘ Cmd + V, press Enter to run.
On Windows, “Command Prompt”
Press the ⊞ Windows key, type cmd, press Enter. In the window, paste with Ctrl + V (or right-click), press Enter to run.
Developer setup One line
Run the command for your client, then follow the sign-in instructions.

Claude Code
- Open Claude Code — or your terminal, the same place you normally run
claude. (New to it? See How to open the typing window above.) - Paste either line below and press Enter: the first tells Claude Code to set Vaaya up itself; the second runs the installer directly. Both set up every other coding agent on your machine too.
- Sign in with Google when your browser opens. That’s the whole setup.
Fastest — paste this into Claude Code itself
set up https://vaaya.ai/skill.mdOr run the installer in a terminal (same on Mac and Windows)
npx @vaaya/mcp install
Cursor
- Open a terminal — Cursor has one built in: Terminal → New Terminal.
- Paste the line below and press Enter. One command sets up Cursor — and every other coding agent on your machine.
- Sign in with Google when your browser opens, then restart Cursor.
Add Vaaya (same on Mac and Windows)
npx @vaaya/mcp install
VS Code
- Open a terminal — VS Code has one built in: Terminal → New Terminal.
- Paste the line below and press Enter. One command sets up VS Code — and every other coding agent on your machine.
- Sign in with Google when your browser opens, then restart VS Code.
Add Vaaya (same on Mac and Windows)
npx @vaaya/mcp install
Gemini CLI
- Open your terminal — the same place you run
gemini. - Paste the line below and press Enter.
- Start Gemini (
gemini) and type/mcpto finish signing in to Vaaya in your browser.
Add Vaaya
gemini mcp add --transport http vaaya https://vaaya.ai/mcp
Codex CLI
- Open your terminal — the same place you run
codex. - Paste the line below and press Enter. One command sets up Codex — and every other coding agent on your machine.
- Sign in with Google when your browser opens.
Add Vaaya (same on Mac and Windows)
npx @vaaya/mcp install
OpenClaw
- Open the terminal where you run
openclaw. - Paste the first line below and press Enter to save the server.
- Paste the second line and press Enter. Your browser opens: sign in with Google and approve.
Add Vaaya
openclaw mcp add vaaya --url https://vaaya.ai/mcp --transport streamable-http --auth oauthSign in
openclaw mcp login vaaya
Hermes
- Open (or create)
~/.hermes/config.yaml. - Add the lines below under
mcp_serversand save. - Run
/reload-mcpinside Hermes (or restart it). The first Vaaya call opens your browser: sign in with Google and approve.
mcp_servers:
  vaaya:
    url: "https://vaaya.ai/mcp"
    auth: oauth
Tools show up prefixed, e.g. mcp_vaaya_consult.
Connect from an AI app Clicking
Add Vaaya from a settings screen: paste the address, sign in, done. No terminal.
Claude Desktop
- Open the Claude app and sign in.
- Go to Customize → Connectors. (Connectors live under Customize, not Settings.)
- Click Add custom connector.
- Name it
Vaaya, paste the address below as the Remote MCP server URL, and click Add. Leave Advanced settings blank. - Your browser opens — sign in with Google and approve. Done: Vaaya appears in the chat’s tools menu.
Paste this as the URL
https://vaaya.ai/mcp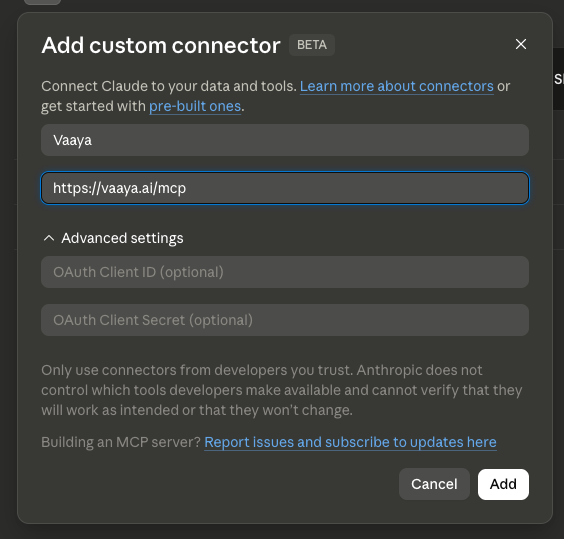
Connectors are account-level: add Vaaya once and it works in the desktop app and on claude.ai. The free plan includes one custom connector.
Claude on the web
- Open claude.ai and sign in.
- Go to Customize → Connectors (in the sidebar / your profile menu) — or skip the hunt: open the shortcut address below and the form opens itself.
- Click Add custom connector.
- Name it
Vaaya, paste the address below as the Remote MCP server URL, and click Add. Leave Advanced settings blank. - In the popup, sign in with Google and approve.
Paste this as the URL
https://vaaya.ai/mcpShortcut — open this in your browser to jump straight to the form
https://claude.ai/customize/connectors?modal=add-custom-connectorWorks on Claude’s free plan — it includes one custom connector, so no upgrade is needed.
ChatGPT on the web
- Open chatgpt.com and sign in.
- Turn on Developer mode: Settings → Security and login → toggle Developer mode on.
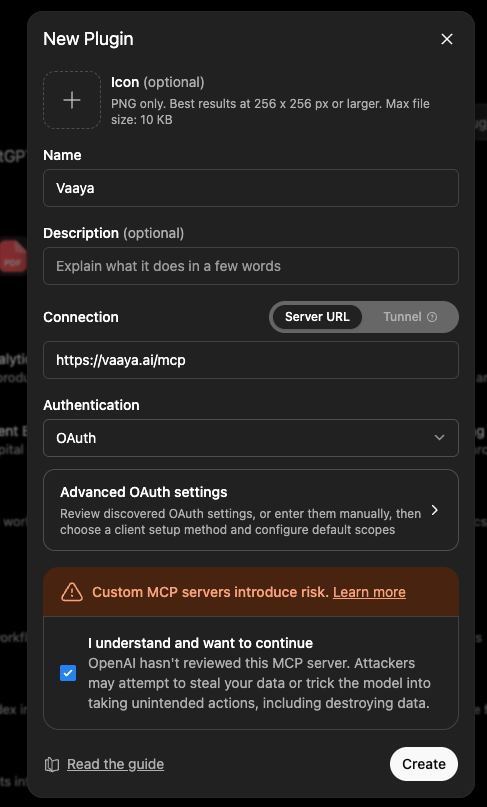
- Go to chatgpt.com/plugins and click +.
- Name it
Vaaya, paste the address below as the MCP server URL, set authentication to OAuth, tick I understand, and click Create. Sign in with Google when your browser opens. - In a chat, open the + / tools menu and switch Vaaya on.
Paste this as the MCP server URL
https://vaaya.ai/mcp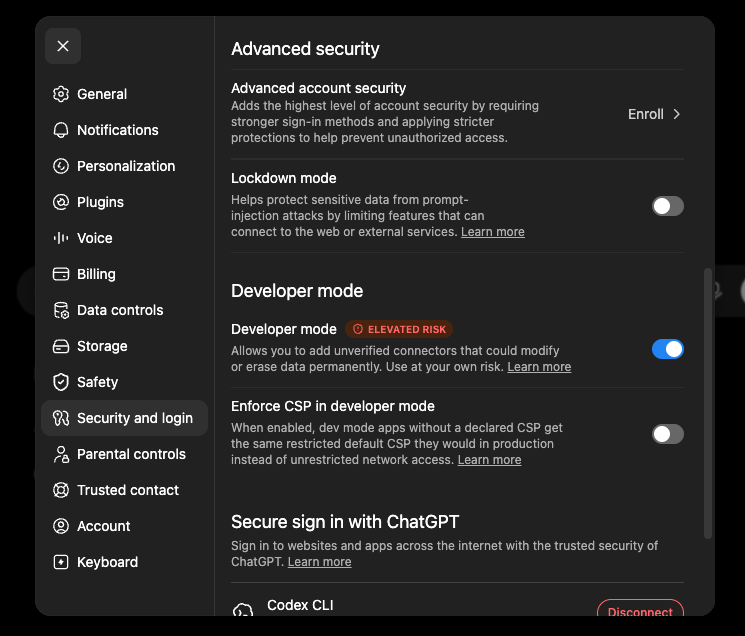
Verify your connection
Run this right after installing. consult is free; this test does not spend your balance.
Any app — ask it to use Vaaya
Send this message to your AI:
Use the Vaaya consult tool and tell me what you can do.You’re set when it runs the tool and replies with what Vaaya can reach (images, web, voice, compute…). The consult tool is free — nothing is charged.
Claude Code / Gemini CLI — run /mcp
In the terminal, type /mcp and look for Vaaya listed as connected:
vaaya ✔ connected · 21 tools
If it shows connected with tools, you’re set. Not there? Re-run the add command above, then /mcp again.
If something doesn’t work
The four things people ask most.
It’s stuck on “Sign in”, or a tool says “insufficient scope”
Remove the connector and add it again. A plain “Reconnect” reuses old, limited permissions — a fresh add fixes it.
Which address do I use?
Copy https://vaaya.ai/mcp exactly — it’s the only address you ever paste into any app.
Do I need “npx” or “mcp-remote”?
No. Vaaya is hosted, so every app connects straight to the address. You never install a bridge.
What does it cost to try?
Personal accounts start with $2 welcome credit; Instinct accounts get $10, including verified @mail.instinct.com email signups. No card required. Signup checks may reduce the allowance; your dashboard shows the actual amount. Add a card and Vaaya settles what your agents actually spend at the end of each week. Connect GitHub to unlock a larger card-backed spending limit, or buy a pack ($10 / $30 / $100) outright. You are only charged for calls that actually run, and a failed call is never billed.